
Make password-less and biometrics an integral part of your strong MFA deployment strategy
As part of your MFA deployment strategy, you can enable users to register their FIDO2 WebAuthn devices as a login multi-factor authentication (MFA) option. SecureAuth supports both roaming authenticators – USB, NFC or Bluetooth-based hardware security keys such as YubiKeys and Google Titan Security Key, and bound authenticators, sometimes also called platform authenticators, such as TouchID on macOS, Windows Hello on Windows 10-based PCs, Android Fingerprint, etc.

Titan Security Key from Google supports FIDO2 WebAuthn protocol. Users can use Titan Security Key for machine login or SSO login with modern cloud IAM solutions such as SecureAuth SaaS IAM.
Getting Started with FIDO2 is Easy
The first step is to configure and save the global settings for WebAuthn in the SecureAuth Administration Console. Once the settings are in place, the system will automatically generate a FIDO2 registration and management page.
The FIDO2 WebAuthn registration and management page is localized and translated based on the user’s browser language settings. To customize the text on the page, you can use the Authentication API.
Share the WebAuthn registration page URL with your users to guide them through the process to register their WebAuthn devices. Once end users register their WebAuthn device using the unique page, it becomes available as a login option to assert their access to resources.
- On the left side of the Administration Console, click Multi-Factor Methods.
- Click the pencil icon for FIDO2 (WebAuthn). The configuration page for FIDO2 (WebAuthn) appears.
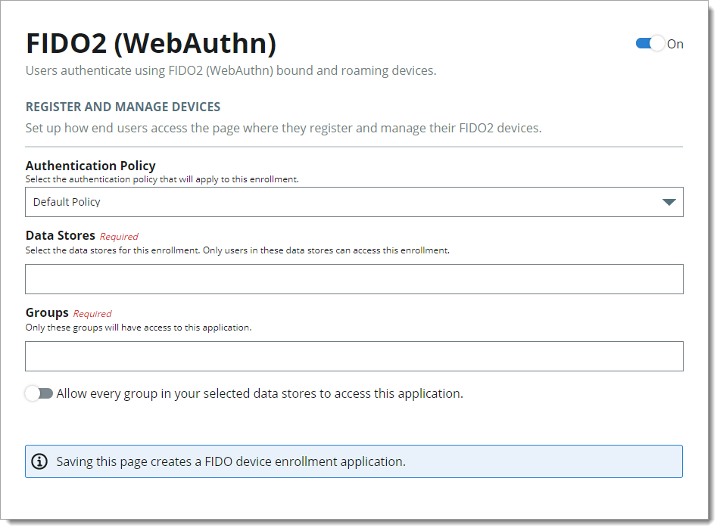
- Set the following configurations.
Authentication Policy
Select the login authentication policy for the FIDO2 registration page. The authentication policy includes the login workflow, the adaptive authentication rules to analyze, and the available authentication methods to select to register the FIDO2 device.
Data Stores
Enter the data stores to authenticate and allow user access to register their FIDO2 device. Start typing to bring up a list of data store names. You can enter more than one data store.
Groups
Use one of the following options:
- Slider in the On position (enabled): Allow users from every group in your selected data stores access to this FIDO2 registration page.
- Slider in the Off position (disabled): Enter the specific groups who are allowed access to this FIDO2 registration page.
This creates the FIDO2 registration page and provides the registration URL. Share this URL with your end users to register and manage their FIDO2 devices.
Note: if you turn off WebAuthn as a login method, it prevents end users from seeing it as an MFA choice during login. The FIDO Enrollment URL page stays active for end users to manage their FIDO2 devices.

Helping your users register FIDO2 (WebAuthn) devices
Copy and share the FIDO Enrollment URL with your end users. For example, to encourage end users to register their FIDO2 device, share the URL in an email blast.
Related information
Define the login workflow and multi-factor methods settings in a policy
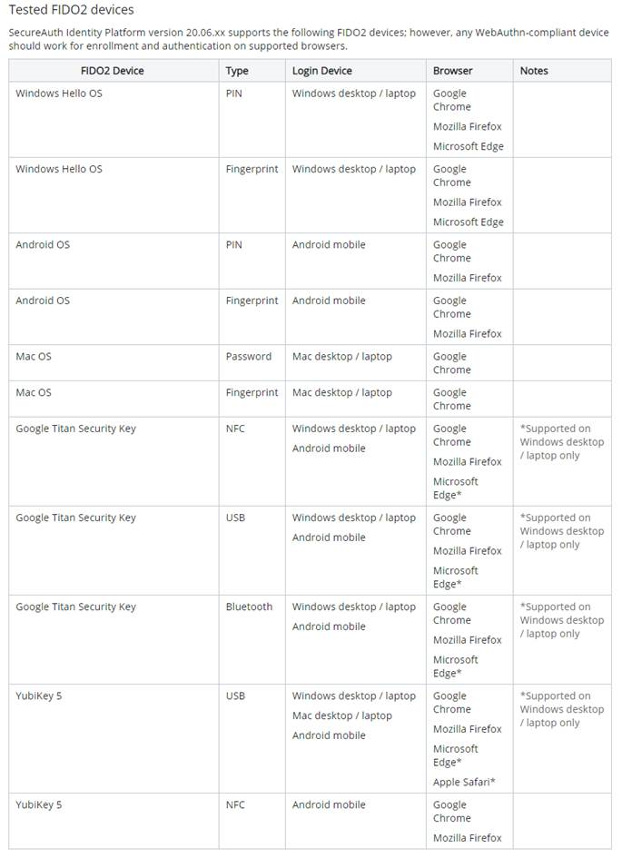
Compatibility
We have tested SecureAuth SaaS IAM with many of the common WebAuthn authenticators.
Availability
SecureAuth’s support for WebAuthn is available in select SecureAuth subscription plans.